
Zelda Tears of the Kingdom Frost Gleeok
The Zelda Tears of the Kingdom Frost Gleeok is a Mini Boss found in the Gerudo Highlands, Hebra Mountains areas of the map and is weak against Fire Attacks. The Frost Gleeok Boss will drop Gleeok Wing, Gleeok Frost Horn, Gleeok Guts.
Where To Find Frost Gleeok Locations
You can find Frost Gleeok enemies near the Gerudo Highlands, Hebra Mountains locations.
| Location | Type | Subtype | Description | Show on map | 
|---|
How To Beat Frost Gleeok
Below we breakdown the Frost Gleeok Weaknesses and Resistances, as well as what Armor, Materials and Food you should use to help you fight the Frost Gleeok in Zelda TotK. Before that lets learn more about the Frost Gleeok stats.
| Detail | Data | 
|---|---|
| Life | 8000 | 
| Attack Power |  Melee: 0  Ranged: 0 | 
| Exp Rewarded | 150.00 XP (Limit: 1500 XP) | 
| Damage Type | Cold | 
| Weakness | Fire | 
| Resistance | Cold | 
Resistances: The Frost Gleeok is resistant to Cold Attacks. You should avoid using fused weapons with these elements.
Frost Gleeok Weakness
The Frost Gleeok is weak against Fire Attacks, which can be produced from fusing materials. Materials that produce Fire Attacks when fused with Weapons, Arrows, and Shields are as follows:
 Fire Keese Eyeball
Fire Keese Eyeball
                         Red Chuchu Jelly
Red Chuchu Jelly
                         Fire Like Stone
Fire Like Stone
                         Fire-Breath Lizalfos Tail
Fire-Breath Lizalfos Tail
                         Fire Keese Wing
Fire Keese Wing
                         Fire-Breath Lizalfos Horn
Fire-Breath Lizalfos Horn
                         Gleeok Flame Horn
Gleeok Flame Horn
                         Dinraal's Horn
Dinraal's Horn
                         Shard of Dinraal's Spike
Shard of Dinraal's Spike
                         Dinraal's Scale
Dinraal's Scale
                         Dinraal's Claw
Dinraal's Claw
                         Shard of Dinraal's Fang
Shard of Dinraal's Fang
                         Ruby
Ruby
                         Flame Emitter
Flame Emitter
                        You can further increase the damage of Fire Attacks against Frost Gleeok when you use the following ingredients in any recipe:
 Fire Fruit
Fire Fruit
                        Frost Gleeok Damage Type
The Frost Gleeok will use Cold Damage Attacks, which means you can use the following Armor and Items to reduce the damage you will receive when hit.
You can reduce the damage of Frost Gleeok Cold Attacks wearing following armor:
 Zant's Helmet
Zant's Helmet
                    
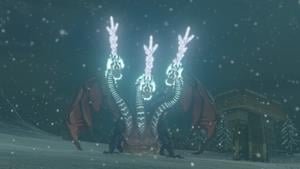
- Frost Gleeoks Description:
 Frost Gleeoks are three-headed, winged Gleeoks. They are gigantic, towering well above Link and dwarfing other large enemies like Moldugas. They have icicle-like horns growing from their heads, and each head has a single eyeball.
- Attacks:
 Each head can separately shoot ice balls and ice beams, or all at once. Their large wings enable them to hover above the ground. When their health is low, they fly very high and rain down giant icicles.
- Using Recall:
 The icicles they drop can be sent back into the air with Recall, allowing Link to reach them.
- Ground Defenses:
 While on the ground, they flap their wings to create strong winds and snowballs that prevent Link from approaching.
- Strategies for Attack:
 To stun them long enough for an attack, Link must shoot all three of their heads in a short span of time.
- Weakness:
 Like most ice elemental enemies, they are vulnerable to fire attacks.
Frost Gleeok Item Drops
When you defeat a Frost Gleeok enemy, it has a chance to drop the following items: Gleeok Wing, Gleeok Frost Horn, Gleeok Guts.
| Drops | Effects | Used For | 
|---|---|---|
|  Fuse Damage: 30  Weapon Fuse: Adds Cold Damage  Arrow Fuse: Adds Cold Damage  Shield Fuse: Adds Cold Damage to Parry Time Boost: 0:40 |  Frostbite Headdress  Frostbite Trousers  Frostbite Shirt | |
|  Fuse Damage: 24  Weapon Fuse: Increased throwing range |  Glide Mask  Glide Tights  Glide Shirt | |
|  |  Ancient Hero's Aspect  Royal Guard Cap  Royal Guard Boots  Royal Guard Uniform | 
All Enemies in Zelda Tears of the Kingdom.
Popular Guides
 Shrine Locations
 Shrine Locations
             Skyview Tower Locations
 Skyview Tower Locations
             Lightroot Locations
 Lightroot Locations
             Best Weapons Tier List
 Best Weapons Tier List
             Best Armor Tier List
 Best Armor Tier List
             Best Armor Sets Tier List
 Best Armor Sets Tier List
             Best Recipes To Make
 Best Recipes To Make
             All Stats Explained
 All Stats Explained
             Interactive Map
 Interactive Map
             Amiibo Rewards List
 Amiibo Rewards List
             Korok Seed Locations
 Korok Seed Locations
             Recipe List
 Recipe List
             Material List
 Material List
             Weapons List
 Weapons List
             Armor List
 Armor List
             Armor Sets List
 Armor Sets List
             Armor Upgrades List
 Armor Upgrades List
             All Fuse Combinations
All Fuse Combinations
             Weapon Fuse Combinations
 Weapon Fuse Combinations
             Arrow Fuse Combinations
 Arrow Fuse Combinations
             Shield Fuse Combinations
 Shield Fuse Combinations
             Zonai Fuse Combinations
 Zonai Fuse Combinations
             Cold Resistance
 Cold Resistance
             Heat Resistance
 Heat Resistance
             Shock Resistance
 Shock Resistance
             Bosses List
 Bosses List
             Enemies List
 Enemies List
             Gloom Hands
 Gloom Hands
             Chasm Locations
 Chasm Locations
             Cave Locations
 Cave Locations
             Well Locations
 Well Locations
             Dragon Tear Locations
 Dragon Tear Locations
             Fairy Fountains Locations
 Fairy Fountains Locations
             Koltin Shop Location
 Koltin Shop Location
             Armor Shop
 Armor Shop
             Jewelry Shop
 Jewelry Shop
             All Shop Locations
 All Shop Locations
             Bargainer Statue Locations
 Bargainer Statue Locations
             Sage's Will Locations
 Sage's Will Locations
             Yiga Schematic Locations
 Yiga Schematic Locations
             Stable Locations
 Stable Locations
             Village Locations
 Village Locations
             Goddess Statue Locations
 Goddess Statue Locations
             Zonai Relief Locations
 Zonai Relief Locations
             Zonai Devices Locations
 Zonai Devices Locations
             
                 
                