Stats & Training
Everything pushes toward special damage here. Salazzle's Speed does the work, Defense pays the price. But you're still getting 2 Speed EVs per KO. Tough to catch, on a medium-fast 1M XP curve.
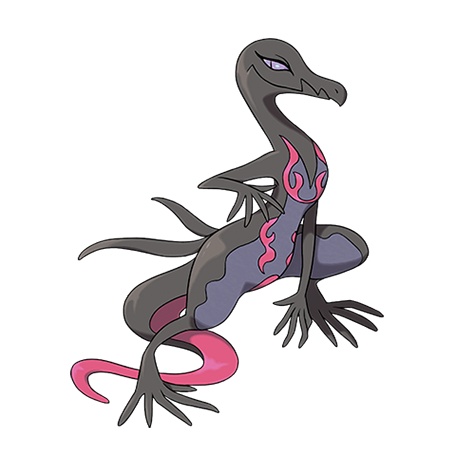
Salazzle makes its opponents light-headed with poisonous gas, then captivates them with alluring movements to turn them into loyal servants.
When two Salazzle meet, they will use their pheromone gas to fight over the males in each other’s group.
Salazzle Weakness
Type-wise, Salazzle takes extra damage from Ground, Water, Psychic, and Rock. Watch out for Ground attacks, those deal 4x damage. It resists 8 types, so it can switch into a lot of moves safely. At base 117 Speed, Salazzle outspeeds most threats and doesn't need to tank what it can outrun.
| Damage | Types |
|---|---|
| 4x (Critical) | Ground |
| 2x (Weak) | Water, Psychic, Rock |
| 0.5x (Resist) | Fire, Ice, Fighting, Poison, Steel |
| 0.25x (Resist) | Grass, Bug, Fairy |
A | ||
Recommended Build AbilitySturdy ItemRocky Helmet NatureBold Moves View Skarmory builds →
| ||
B | ||
Recommended Build AbilityLevitate ItemRocky Helmet NatureBold Moves
Damage vs Salazzle View Weezing builds →Sludge Bomb23-27% | ||
B | ||
Recommended Build AbilityClearbody ItemLeftovers NatureImpish Moves View Registeel builds →
| ||
Thwackey Grass | C | |
Recommended Build AbilityGrassy Surge ItemTerrain Extender NatureAdamant Moves
Damage vs Salazzle View Thwackey builds →U Turn9-10% Knock Off32-38% | ||
C | ||
Recommended Build AbilitySwarm ItemFocus Sash NatureJolly Moves
Damage vs Salazzle View Leavanny builds →Knock Off33-39% | ||
Evolution
Salazzle is what Salandit becomes. Breed it for Salandit eggs (average hatch time). Plenty of partners for breeding via two egg groups. Eggs are average hatch time. The evolution from Salandit pushed Salazzle to 480 total stats. Sp.Atk saw the largest single gain at +40. View every chain in the Evolution Chart.
How to Evolve


Breeding
Breed with Salazzle to get Salandit eggs using 72 partners from the Dragon and Monster egg groups.


Salazzle Best Moveset
The game plan is straightforward: click Nasty Plot, then sweep. Heavy-Duty Boots and Corrosion support the setup turn. EVs go into max Sp. Atk and Speed so Salazzle hits hard once it's boosted.
Best Build
Salazzle best EVs are Sp. Atk and Speed
Special Setup Sweeper Moveset
- Flamethrower
- Toxic
- Nasty Plot
- Sludge Bomb
Recommended Teammates
Support Moveset
- Flamethrower
- Substitute
- Encore
- Thunder Wave
Recommended Teammates
Special Attacker Moveset
- Toxic
- Flamethrower
- Protect
- Substitute
Recommended Teammates
Bulky Support Moveset
- Toxic
- Protect
- Flamethrower
- Substitute
Recommended Teammates
Special Sweeper Moveset
- Flamethrower
- Toxic
- Sludge Bomb
- Protect
Recommended Teammates
Special Setup Sweeper Moveset
- Flamethrower
- Nasty Plot
- Sludge Bomb
- Toxic
Recommended Teammates
Special Sweeper Moveset
- Toxic
- Flamethrower
- Sludge Wave
- Sludge Bomb
Doubles Special Sweeper Moveset
- Heat Wave
- Toxic
- Sludge Bomb
- Dragon Pulse
Recommended Teammates
Doubles Special Sweeper Moveset
- Sludge Bomb
- Fake Out
- Heat Wave
- Dragon Pulse
Recommended Teammates
Special Attacker Moveset
- Toxic
- Flamethrower
- Fire Blast
- Substitute
Recommended Teammates
Doubles Special Sweeper Moveset
- Sludge Bomb
- Fake Out
- Heat Wave
- Dragon Pulse
Recommended Teammates
Special Attacker Moveset
- Toxic
- Flamethrower
- Fire Blast
- Substitute
Recommended Teammates
Moves
Most of Salazzle's flexibility comes from TMs. Same-type output runs through Overheat and Flare Blitz, but Normal and Dark and the rest of the TM pool push it from predictable to genuinely threatening.
Level-Up Moves
TM Moves
Egg Moves
Tutor Moves
Breeding's the move. Belch and Fake Out give Salazzle options it can't learn any other way, and coverage across 8 types already covers a decent range on top of Overheat and Flare Blitz. The egg moves push it further.
Breeding's the move. Belch and Fake Out give Salazzle options it can't learn any other way, and coverage across 7 types already covers a decent range on top of Overheat and Belch. The egg moves push it further.
Breeding's the move. Belch and Fake Out give Salazzle options it can't learn any other way, and Normal and Dragon coverage and more already covers a decent range on top of Overheat and Belch. The egg moves push it further.
How to Get Salazzle
Salazzle tops out at low spawn rates across 24 locations in late-game routes. The encounters below are sorted by rate so you can see exactly what you're working with.
Where To Catch Salazzle in Scarlet & Violet
To get Salazzle, start by catching Salandit through walking encounters at Lv. 10-52. The chain covers 2 catchable stages before reaching the final form.
 Step 1Catch SalanditEast Province (Area One) - CaveScarletOverworld Lv.10-40 Route36%EarlyEast Province (Area One) - CaveVioletOverworld Lv.10-40 Route36%EarlyEast Province (Area Three) - CaveScarletOverworld Lv.10-40 Route36%EarlyEast Province (Area Three) - CaveVioletOverworld Lv.10-40 Route36%EarlyGlaseado MountainVioletOverworld Lv.10-40 Cave36%EarlyGlaseado MountainVioletOverworld Lv.10-40 Cave36%EarlyGlaseado MountainScarletOverworld Lv.10-40 Cave36%EarlyGlaseado MountainScarletOverworld Lv.10-40 Cave36%EarlyNorth Province (Area One) - CaveVioletOverworld Lv.10-40 Route36%EarlyNorth Province (Area One) - CaveScarletOverworld Lv.10-40 Route36%EarlyNorth Province (Area Three) - CaveVioletOverworld Lv.10-40 Route36%EarlyNorth Province (Area Three) - CaveScarletOverworld Lv.10-40 Route36%EarlyNorth Province (Area Two) - CaveVioletOverworld Lv.10-40 Route36%EarlyNorth Province (Area Two) - CaveScarletOverworld Lv.10-40 Route36%EarlySouth Province (Area One) - CaveVioletOverworld Lv.10-40 Route36%EarlySouth Province (Area One) - CaveScarletOverworld Lv.10-40 Route36%EarlySouth Province (Area Six) - CaveVioletOverworld Lv.10-40 Route36%EarlySouth Province (Area Six) - CaveScarletOverworld Lv.10-40 Route36%EarlyWest Province (Area One) - CaveVioletOverworld Lv.10-40 Route36%EarlyWest Province (Area One) - CaveScarletOverworld Lv.10-40 Route36%EarlyWest Province (Area Three) - CaveVioletOverworld Lv.10-40 Route36%EarlyWest Province (Area Three) - CaveScarletOverworld Lv.10-40 Route36%EarlyWest Province (Area Two) - CaveScarletOverworld Lv.10-40 Route36%EarlyWest Province (Area Two) - CaveVioletOverworld Lv.10-40 Route36%Early
 Step 2Salazzle ✓East Province (Area One) - CaveVioletOverworld Lv.33-52 Route1%LateEast Province (Area One) - CaveScarletOverworld Lv.33-52 Route1%LateEast Province (Area Three) - CaveVioletOverworld Lv.33-52 Route1%LateEast Province (Area Three) - CaveScarletOverworld Lv.33-52 Route1%LateGlaseado MountainVioletOverworld Lv.33-52 Cave1%LateGlaseado MountainScarletOverworld Lv.33-52 Cave1%LateGlaseado MountainVioletOverworld Lv.33-52 Cave1%LateGlaseado MountainScarletOverworld Lv.33-52 Cave1%LateNorth Province (Area One) - CaveVioletOverworld Lv.33-52 Route1%LateNorth Province (Area One) - CaveScarletOverworld Lv.33-52 Route1%LateNorth Province (Area Three) - CaveVioletOverworld Lv.33-52 Route1%LateNorth Province (Area Three) - CaveScarletOverworld Lv.33-52 Route1%LateNorth Province (Area Two) - CaveVioletOverworld Lv.33-52 Route1%LateNorth Province (Area Two) - CaveScarletOverworld Lv.33-52 Route1%LateSouth Province (Area One) - CaveVioletOverworld Lv.33-52 Route1%LateSouth Province (Area One) - CaveScarletOverworld Lv.33-52 Route1%LateSouth Province (Area Six) - CaveVioletOverworld Lv.33-52 Route1%LateSouth Province (Area Six) - CaveScarletOverworld Lv.33-52 Route1%LateWest Province (Area One) - CaveVioletOverworld Lv.33-52 Route1%LateWest Province (Area One) - CaveScarletOverworld Lv.33-52 Route1%LateWest Province (Area Three) - CaveVioletOverworld Lv.33-52 Route1%LateWest Province (Area Three) - CaveScarletOverworld Lv.33-52 Route1%LateWest Province (Area Two) - CaveScarletOverworld Lv.33-52 Route1%LateWest Province (Area Two) - CaveVioletOverworld Lv.33-52 Route1%Lateor evolve from Salandit (Step 1)
You're catching Salandit first, not Salazzle. Salandit appears at decent rates in the encounters below. The step cards map the full 2-stage line with evolution methods between each stage.
How to Obtain Salazzle in Sword & Shield
The path to Salazzle starts with Salandit at Lv. 10-30 via walking encounters. 1 catchable stage total, with locations listed for each one below.
 Step 1Catch SalanditChallenge RoadShieldOverworld Lv.10-15 Route16%EarlyNormal WeatherChallenge RoadShieldOverworld Lv.10-15 Route16%EarlySnowstormChallenge RoadShieldOverworld Lv.10-15 Route16%EarlyThunderstormChallenge RoadShieldOverworld Lv.10-15 Route16%EarlyIntense SunChallenge RoadShieldOverworld Lv.10-15 Route16%EarlySnowingChallenge RoadShieldOverworld Lv.10-15 Route16%EarlySandstormChallenge RoadShieldOverworld Lv.10-15 Route16%EarlyRainingChallenge RoadShieldOverworld Lv.10-15 Route16%EarlyHeavy FogChallenge RoadShieldOverworld Lv.10-15 Route16%EarlyOvercastMotostoke RiverbankShieldOverworld Lv.28-3025%MidIntense SunChallenge RoadSwordOverworld Lv.16-21 Route16%MidThunderstormChallenge RoadSwordOverworld Lv.16-21 Route16%MidIntense SunChallenge RoadSwordOverworld Lv.16-21 Route16%MidSnowingChallenge RoadSwordOverworld Lv.16-21 Route16%MidSandstormChallenge RoadSwordOverworld Lv.16-21 Route16%MidRainingChallenge RoadSwordOverworld Lv.16-21 Route16%MidHeavy FogChallenge RoadSwordOverworld Lv.16-21 Route16%MidOvercastChallenge RoadSwordOverworld Lv.16-21 Route16%MidNormal WeatherChallenge RoadSwordOverworld Lv.16-21 Route16%MidSnowstormStony WildernessShieldOverworld Lv.28-3015%MidIntense SunStony WildernessSwordOverworld Lv.28-3015%MidIntense SunStony Wilderness - 2ShieldOverworld Lv.28-3015%MidIntense SunStony Wilderness - 3ShieldOverworld Lv.28-3015%MidIntense SunMotostoke OutskirtsShieldOverworld Lv.22-265%MidAll WeatherStony Wilderness - 3SwordOverworld Lv.28-305%MidIntense Sun
 Step 2Salazzle ✓
moderate rates across 5 locations for Salazzle in mid-game routes. Scroll the sorted list below and pick whichever spot sits closest to your current route. The rate differences between locations are worth comparing.
Where To Catch Salazzle in Ultra Sun & Ultra Moon
The path to Salazzle starts with Salandit at Lv. 16-44 via walking and gift encounters. 2 catchable stages total, with locations listed for each one below.
 Step 1Catch SalanditWela Volcano ParkUltra SunGrass Lv.16-19 Volcano30%MidWela Volcano ParkUltra MoonGrass Lv.16-19 Volcano30%MidRoute 8Ultra MoonGrass Lv.17-20 Route15%MidRoute 8Ultra SunGrass Lv.17-20 Route15%MidLush Jungle - East CaveUltra MoonGrass Lv.41-44 Forest30%LateLush Jungle - East CaveUltra SunGrass Lv.41-44 Forest30%Late
 Step 2Salazzle ✓Wela Volcano ParkUltra SunGrass Lv.16-19 VolcanoMidSOS from SalanditWela Volcano ParkUltra MoonGrass Lv.16-19 VolcanoMidSOS from SalanditHeahea BeachUltra MoonGift from NPC Lv.30 WaterMidTotem gift (50 stickers)Lush Jungle - East CaveUltra MoonGrass Lv.41-44 ForestLateSOS from SalanditLush Jungle - East CaveUltra SunGrass Lv.41-44 ForestLateSOS from Salanditor evolve from Salandit (Step 1)
No wild encounters for Salazzle. The 2-stage line runs through Salandit, which you can catch at solid rates from the locations below. Evolve at level 33 once you've got the levels.
How to Obtain Salazzle in Sun & Moon
The path to Salazzle starts with Salandit at Lv. 16-20 via walking encounters. 1 catchable stage total, with locations listed for each one below.
 Step 1Catch SalanditWela Volcano ParkMoonGrass Lv.16-19 Volcano30%MidWela Volcano ParkSunGrass Lv.16-19 Volcano30%MidRoute 8MoonGrass Lv.17-20 Route20%MidRoute 8SunGrass Lv.17-20 Route20%Mid
 Step 2Salazzle ✓
Salazzle Guide
Salazzle works as a sweeper with 480 BST behind it. A-Tier on our list: a strong competitive pick. That 117 base Speed does the heavy lifting.
Salazzle's biggest threats include Swampert (Ground), Milotic (Water), and Reuniclus (Psychic), all carrying super-effective STAB moves. Swampert is the most dangerous since Ground moves deal 4x damage. Rock-type attackers are also a problem. Salazzle's base 117 Speed lets it outpace many threats and strike first, which matters more than trying to tank hits.
Corrosion is the go-to ability for Salazzle. It this Pokémon can inflict poison on Poison and Steel Pokémon. Its hidden ability Oblivious can work in specific setups.
Salazzle is a special attacker with base 111 Sp. Atk. Speed tells the real story. Base 117 Speed lets it outrun most of the field. Fits the sweeper role.
Best way to handle Salazzle: Priority moves (Mach Punch, Aqua Jet, Ice Shard) bypass its speed. Bulky walls that resist its STAB also shut it down.
Game Availability
Since Sun & Moon, Salazzle has been obtainable in 4 games. A Generation 7 debut means a shorter history, but Salazzle has appeared steadily across every generation since.
Click a game to view version-specific details
- Gen 1Y
 Yellow
 - Gen 1RB

 Red & Blue
 - Gen 2GS

 Gold & Silver
 - Gen 2C
 Crystal
 - Gen 3RS

 Ruby & Sapphire
 - Gen 3FRLG

 FireRed & LeafGreen
 - Gen 3E
 Emerald
 - Gen 4Pt
 Platinum
 - Gen 4HGSS

 HeartGold & SoulSilver
 - Gen 4DP

 Diamond & Pearl
 - Gen 5BW

 Black & White
 - Gen 5B2W2

 Black 2 & White 2
 - Gen 6XY

 X & Y
X & Y - Gen 6ORAS

 Omega Ruby & Alpha Sapphire
 - Gen 7USUM

 Ultra Sun & Ultra Moon
 - Gen 7SMDebut

 Sun & Moon
 - Gen 7LGPE

 Let's Go Pikachu & Eevee
 - Gen 8SwSh

 Sword & Shield
 - Gen 8PLA
 Legends: Arceus
 - Gen 8BDSP

 Brilliant Diamond & Shining Pearl
 - Gen 9SV

 Scarlet & Violet
 - Gen 9LZA
 Legends: Z-A
 - Gen 10WW

 Winds & Waves