
Is Stakataka Good in Ultra Sun & Ultra Moon Playthrough?
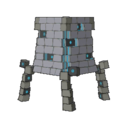
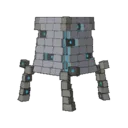
Ultra Sun exclusive Rock/Steel Ultra Beast. Available postgame via Ultra Wormhole. 211 Defense, the highest of any Pokemon. AbilityBeast Boost usually raises Attack. Slow, but nothing gets through those defenses physically. Postgame only.
Stakataka resists most of Ilima's coverage and hits back hard.
Stakataka trades roughly evenly with Hala's team.
Stakataka has the type edge here and should clean up Lana's team.
 ElectricSteelReceived as a Totem-sized gift Pokemon by collecting enou... (Ultra Moon only)
 BugElectricReceived as a Totem-sized gift Pokemon by collecting enou... (Ultra Sun only)
 GrassReceived as a Totem-sized gift Pokemon by collecting enou... (Ultra Sun only)
 GhostFairyReceived as a Totem-sized gift Pokemon by collecting enou...
Stakataka has the type edge here and should clean up Kiawe's team.
Stakataka has the type edge here and should clean up Mallow's team.
Stakataka resists most of Olivia's coverage and hits back hard.
Stakataka has the type edge here and should clean up Sophocles's team.
Stakataka has the type edge here and should clean up Acerola's team.
Stakataka has the type edge here and should clean up Nanu's team.
Stakataka has the type edge here and should clean up Mina's team.
Hapu's team hits Stakataka's weaknesses hard.
Stakataka trades roughly evenly with Molayne's team.
Stakataka has the type edge here and should clean up Olivia's team.
Stakataka has the type edge here and should clean up Acerola's team.
Stakataka resists most of Kahili's coverage and hits back hard.
Stakataka has the type edge here and should clean up Kukui's team.
Catch Stakataka on Poni Grove (walking, Lv 60). LIMITED; After beating Elite Four.
Ultra Sun & Ultra Moon Stakataka Locations
A few locations for Stakataka with moderate rates across endgame routes. The sort toggle below swaps between best odds and earliest access, so you can approach it based on where you are in the game.
Best Locations to Catch Stakataka in Ultra Sun & Ultra Moon
Stakataka Weakness
Fighting, Ground, and Water moves hit Stakataka for super-effective damage. Fighting and Ground hits land at 4x, so they're the biggest threat. The upside? Poison-type moves can't touch it at all. With 8 resistances, the defensive profile is strong. Stakataka's physical bulk (base 211 Def) helps cushion physical weakness hits, but special attackers are the bigger threat.
| Damage | Types |
|---|---|
| 4x (Critical) | Fighting, Ground |
| 2x (Weak) | Water |
| 0.5x (Resist) | Ice, Psychic, Bug, Rock, Dragon, Fairy |
| 0.25x (Resist) | Normal, Flying |
| 0x (Immune) | Poison |
What is Stakataka Weak Against
GoodBest Pokemon Against Stakataka
Hawlucha Fighting | A | |
Machop Fighting | C | |
Crabrawler Fighting | C | |
Available Moves Moves
Damage vs Stakataka View Crabrawler builds →Brick Break 4x70-84% Bubble 2x16-20% | ||
Mankey Fighting | C | |
Slowbro WaterPsychic | B | |
Available Moves Moves
Damage vs Stakataka View Slowbro builds →Brick Break 4x46-56% Water Gun 2x40-48% | ||
Hawlucha Fighting | A | |
Machop Fighting | C | |
Marshtomp WaterGround | C | |
Available Moves Moves
Damage vs Stakataka View Marshtomp builds →Brick Break 4x46-55% Mud Bomb 4x78-92% Water Gun 2x26-32% | ||
Crabrawler Fighting | C | |
Available Moves Moves
Damage vs Stakataka View Crabrawler builds →Brick Break 4x62-74% Bubble Beam 2x20-25% | ||
Mankey Fighting | C | |
Hawlucha Fighting | A | |
Machop Fighting | C | |
Marshtomp WaterGround | C | |
Available Moves Moves
Damage vs Stakataka View Marshtomp builds →Brick Break 4x50-60% Mud Shot 4x75-90% Water Gun 2x28-35% | ||
Crabrawler Fighting | C | |
Available Moves Moves
Damage vs Stakataka View Crabrawler builds →Brick Break 4x67-80% Bubble Beam 2x25-30% | ||
Mankey Fighting | C | |
Passimian Fighting | C | |
Gallade PsychicFighting | C | |
Hawlucha Fighting | A | |
Mudbray Ground | C | |
Available Moves Moves
Damage vs Stakataka View Mudbray builds →High Horsepower 4x94-111%KO Double Kick 4x24-29% | ||
Marshtomp WaterGround | C | |
Available Moves Moves
Damage vs Stakataka View Marshtomp builds →Brick Break 4x43-51% Mud Bomb 4x80-94% Water Gun 2x29-34% | ||
Poliwrath WaterFighting | C | |
Available Moves Moves
Damage vs Stakataka View Poliwrath builds →Brick Break 4x70-83% Bulldoze 4x38-45% Bubble Beam 2x44-53% | ||
Bewear NormalFighting | B | |
Obtain MethodHauoli City Interact Encounter Available Moves Moves
Damage vs Stakataka View Bewear builds →Brick Break 4x89-105%KO Bulldoze 4x46-55% | ||
Passimian Fighting | C | |
Available Moves Moves
Damage vs Stakataka View Passimian builds →Brick Break 4x83-98% Bulldoze 4x46-55% | ||
Hariyama Fighting | C | |
Available Moves Moves
Damage vs Stakataka View Hariyama builds →Brick Break 4x83-98% Bulldoze 4x46-55% Brine 2x21-25% | ||
Gallade PsychicFighting | C | |
Available Moves Moves
Damage vs Stakataka View Gallade builds →Brick Break 4x89-105%KO Bulldoze 4x46-55% | ||
Pangoro FightingDark | C | |
Available Moves Moves
Damage vs Stakataka View Pangoro builds →Hammer Arm 4x114-135%KO Bulldoze 4x48-57% | ||
Poliwrath WaterFighting | C | |
Available Moves Moves
Damage vs Stakataka View Poliwrath builds →Brick Break 4x72-86% Bulldoze 4x38-45% Bubble Beam 2x44-52% | ||
Bewear NormalFighting | B | |
Obtain MethodHauoli City Interact Encounter Available Moves Moves
Damage vs Stakataka View Bewear builds →Brick Break 4x88-104%KO Bulldoze 4x48-57% | ||
Passimian Fighting | C | |
Available Moves Moves
Damage vs Stakataka View Passimian builds →Brick Break 4x83-98% Bulldoze 4x45-53% | ||
Hariyama Fighting | C | |
Available Moves Moves
Damage vs Stakataka View Hariyama builds →Brick Break 4x83-98% Bulldoze 4x45-53% Brine 2x20-24% | ||
Passimian Fighting | C | |
Available Moves Moves
Damage vs Stakataka View Passimian builds →Close Combat 4x121-144%KO Bulldoze 4x42-50% | ||
Blaziken FireFighting | B | |
Available Moves Moves
Damage vs Stakataka View Blaziken builds →High Jump Kick 4x135-159%KO Bulldoze 4x42-50% | ||
Infernape FireFighting | B | |
Available Moves Moves
Damage vs Stakataka View Infernape builds →Close Combat 4x10⁹-129%KO Bulldoze 4x39-46% | ||
Bewear NormalFighting | B | |
Obtain MethodHauoli City Interact Encounter Available Moves Moves
Damage vs Stakataka View Bewear builds →Hammer Arm 4x10⁵-124%KO Bulldoze 4x45-53% | ||
Torterra GrassGround | C | |
Swampert WaterGround | C | |
Available Moves Moves
Damage vs Stakataka View Swampert builds →Earthquake 4x94-111%KO Brick Break 4x49-58% Waterfall 2x38-45% | ||
Passimian Fighting | C | |
Available Moves Moves
Damage vs Stakataka View Passimian builds →Close Combat 4x122-144%KO Bulldoze 4x42-49% | ||
Hariyama Fighting | C | |
Available Moves Moves
Damage vs Stakataka View Hariyama builds →Close Combat 4x122-144%KO Bulldoze 4x42-49% Surf 2x25-30% | ||
Gallade PsychicFighting | C | |
Available Moves Moves
Damage vs Stakataka View Gallade builds →Close Combat 4x125-148%KO Bulldoze 4x44-52% | ||
Blaziken FireFighting | B | |
Available Moves Moves
Damage vs Stakataka View Blaziken builds →High Jump Kick 4x132-156%KO Bulldoze 4x42-49% | ||
Cobalion SteelFighting | B | |
Obtain MethodUltra Space Wilds Interact Encounter Available Move Moves
Damage vs Stakataka View Cobalion builds →Close Combat 4x97-114%KO | ||
Bewear NormalFighting | B | |
Obtain MethodHauoli City Interact Encounter Available Moves Moves
Damage vs Stakataka View Bewear builds →Superpower 4x129-152%KO Earthquake 4x72-85% | ||
Marowak Ground | C | |
Obtain MethodHeahea Beach Gift Available Moves Moves
Damage vs Stakataka View Marowak builds →Earthquake 4x76-90% Brick Break 4x39-46% | ||
Passimian Fighting | C | |
Available Moves Moves
Damage vs Stakataka View Passimian builds →Close Combat 4x123-145%KO Earthquake 4x68-80% | ||
Hariyama Fighting | C | |
Available Moves Moves
Damage vs Stakataka View Hariyama builds →Close Combat 4x123-145%KO Earthquake 4x68-80% Surf 2x25-30% | ||
In Ultra Sun & Ultra Moon, Tapu Koko's Thunderbolt hits Stakataka for 36-42%. Greninja's Hydro Pump also KOs at 93-109%.
S | ||
Recommended Build AbilitySoulheart ItemAssault Vest NatureCalm Moves
Damage vs Stakataka View Magearna builds →Volt Switch19-23% Ice Beam12-14% | ||
S | ||
Recommended Build AbilityElectric Surge ItemChoice Specs NatureTimid Moves
Damage vs Stakataka View Tapu Koko builds →Thunderbolt36-42% Volt Switch28-33% Dazzling Gleam16-19% | ||
S | ||
Recommended Build AbilityBattlebond ItemChoice Specs NatureTimid Moves
Damage vs Stakataka View Greninja builds →Dark Pulse34-40% Ice Beam19-22% Hydro Pump 2x93-109%KO | ||
Lucario FightingSteel | B | |
Recommended Build AbilityInnerfocus ItemLife Orb NatureTimid Moves
Damage vs Stakataka View Lucario builds →Close Combat 4x118-139%KO Extreme Speed3-4% Flash Cannon48-56% | ||
Stakataka Evolutions
At 570 base stat total, Stakataka hits hard for a Rock/Steel type. No evolution chain and no egg group, just a straight pickup. View every chain in the Evolution Chart.
How to Evolve
Breeding
USUM Stakataka Best Moveset
211 Defense with Rock/Steel typing and AbilityBeast Boost raising the highest stat on each KO. 131 Attack provides real physical power. MoveTrick Room turns 13 Speed into acting first. The moveset holds B-tier through the highest physical Defense in the format combined with Trick Room that converts the lowest Speed into an advantage.
Best Build
Stakataka best EVs are HP and Attack
Physical Tank Moveset
- Gyro Ball
- Trick Room
- Stone Edge
- Earthquake
Recommended Teammates
Moves List
Level-up moves are just the starting point for Stakataka. TMs unlock Normal and Dark coverage and more and turn a straightforward STAB kit around Stone Edge and Iron Head into something with actual range.
How to Read the Moves Table
Tabs
- Level-Up
- Learned by leveling up.
- TM
- Taught by a Technical Machine.
- Egg
- Inherited via breeding.
- Tutor
- NPC tutor (cost: items, BP, money).
- Reminder
- An NPC reteaches any move this Pokemon could have learned by leveling up.
- Transfer
- Carried over from an older game using Pokemon HOME.
- Event
- Given out through Mystery Gift events.
Visual Signals
CAT (Category)
How the move deals damage and which stats it uses.
A small dot on the icon's corner marks the move as contact. That triggers abilities like Static, Flame Body, Rough Skin, or Iron Barbs, plus items like Rocky Helmet and Sticky Barb.
Tier (S to D)
Each move's competitive rank in RankedBoost's system. TM, Egg, and Tutor sort by tier by default (best first). On Level-Up, click the Tier header to do the same.
PWR (Power)
Base damage. Numbers shown in a type color include STAB (base × 1.5). Hover any colored number to see the math.
— means no power (status moves) or variable power.
Sorting & Filter
Click any column header to sort. Level-Up opens with Lv 1 at the top. TM, Egg, and Tutor open with the highest-tier moves at the top.
Search filters by move name or type. The Filter button limits the list to STAB, Physical, Special, or Status moves.
Level-Up Moves
TM Moves
Egg Moves
Tutor Moves
Base Stats
It appeared from an Ultra Wormhole. Each one appears to be made up of many life-forms stacked one on top of each other.
When stone walls started moving and attacking, the brute’s true identity was this mysterious life-form, which brings to mind an Ultra Beast.
Stakataka Ultra Sun & Ultra Moon Guide
For Ultra Sun & Ultra Moon, we rate Stakataka B-Tier: a solid option in Ultra Sun & Ultra Moon for the right team. At 570 BST, it fits the wallbreaker role. Gyroball with Air Balloon is the standard set.
In Ultra Sun & Ultra Moon, watch for Machamp (Fighting), Rhydon (Ground), and Gyarados (Water) when using Stakataka. They all hit it super-effectively with STAB. Machamp is the most dangerous since Fighting moves deal 4x damage. At base 13 Speed, Stakataka won't outrun any of these threats so switching to a resist is usually the safer play.
Beast Boost raises this Pokémon's highest stat by one stage when it faints another Pokémon. That's the one you want on Stakataka. It's the only ability Stakataka has.
Base 13 Speed is low. Priority moves or Trick Room are the way to go. On offense, Stakataka is a physical attacker with base 131 Attack. Defensively? Tanky enough to absorb a few hits. Best used as a wallbreaker.
In Ultra Sun & Ultra Moon, run Gyroball, Trickroom, Stone Edge, and Earthquake on Stakataka. Gyroball is the most common pick at 0% usage. This set covers the wallbreaker role with a mix of damage and utility.
Game Availability
Stakataka joined the series in Sun & Moon and has been available in 2 titles so far. With 4 generations of appearances, it's established itself despite the later start.
Click a game to view version-specific details
- Gen 1RB

 Red & Blue
 - Gen 1Y
 Yellow
 - Gen 2GS

 Gold & Silver
 - Gen 2C
 Crystal
 - Gen 3RS

 Ruby & Sapphire
 - Gen 3E
 Emerald
 - Gen 3FRLG

 FireRed & LeafGreen
 - Gen 4DP

 Diamond & Pearl
 - Gen 4Pt
 Platinum
 - Gen 4HGSS

 HeartGold & SoulSilver
 - Gen 5BW

 Black & White
 - Gen 5B2W2

 Black 2 & White 2
 - Gen 6XY

 X & Y
X & Y - Gen 6ORAS

 Omega Ruby & Alpha Sapphire
 - Gen 7SMDebut

 Sun & Moon
 - Gen 7USUM

 Ultra Sun & Ultra Moon
 - Gen 7LGPE

 Let's Go Pikachu & Eevee
 - Gen 8SwSh

 Sword & Shield
 - Gen 8BDSP

 Brilliant Diamond & Shining Pearl
 - Gen 8PLA
 Legends: Arceus
 - Gen 9SV

 Scarlet & Violet
 - Gen 9LZA
 Legends: Z-A
 - Gen 10WW

 Winds & Waves