Zelda Breath of the Wild Armor Upgrades and their Level Up Cost of materials for each Head, Body, and Legs Clothing.

Quickly Navigate Through This Breath of the Wild Armor List
Where Do I Find Armor In Zelda Breath of the Wild?
Pieces of Armor Sets are found in a variety of ways, most will be from completing Side Quest and Shrines. Once you have all the pieces of a specific armor set you will receive a Set Bonus.
What’s a Set Bonus?
An Armor Set Bonus is a Special Skill or Buff Boost that will become active when you are wearing all pieces of a specific Armor Set. Most Armor Sets will require you Upgrade it at least twice at Great Fairy Fountains.
You Can View More About Fairy Fountains Here:
Great Fariy Fountains
Zelda Breath of the Wild Armor Sets
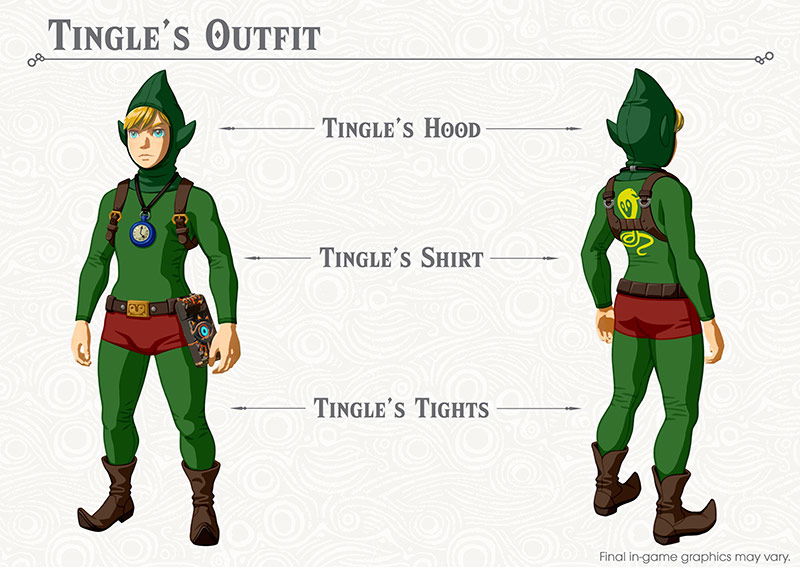
Tingle’s Outfit Armor Set
|
Tingle’s Set
|
Defense Rating
|
How To Get
|
|---|---|---|
| Tingle’s Hood | 2 (Night Speed Up) |
The Tingle’s Outfit is only obtained by finding chests with The Master Trials DLC enabled. To find them, you need the journal at the Outpost Ruins written by Misko the Bandit as part of the NEW DLC Quest, EX Treasure: Fairy Clothes. |
| Tingle’s Shirt | 2 (Night Speed Up) |
|
| Tingle’s Tights | 2 (Night Speed Up) |
- Tingle’s Outfit Armor Bonus:
- Full Tingle’s Outfit Armor Set Bonus: Night Speed Up
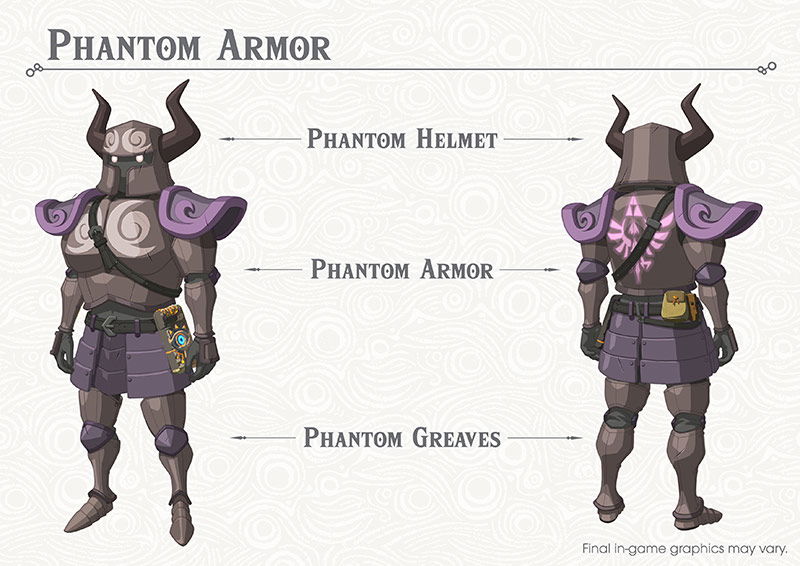
Phantom Armor Set
|
Phantom Set
|
Defense Rating
|
How To Get
|
|---|---|---|
| Phantom Helmet | 8 (Bonus Attack Up) |
To find the phantom armor, find the Outpost Ruins for the Bandit Misko’s journal as part of the NEW DLC Quest: EX Treasure: Phantasma. You will then need to head to the Sacred Ground Ruins just South of Hyrule Castle itself. Once at the ruins, check the middle ring of water along the Southeast side (Use Magnesis to pull the chest out of the rubble.) |
| Phantom Armor | 8 (Bonus Attack Up) |
|
| Phantom Greaves | 8 (Bonus Attack Up) |
- Phantom Armor Bonus:
- Full Phantom Armor Set Bonus: Attack Up (Increases Attack Damage With Weapons)
Ancient Armor Set


|
Ancient Set
|
Defense Rating
|
How To Get
|
|---|---|---|
| Ancient Helm | 4 (Guardian Resistance) |
Shop: Akkala Ancient Tech Lab |
| Ancient Curlass | 4 (Guardian Resistance) |
Shop: Akkala Ancient Tech Lab |
| Ancient Greaves | 4 (Guardian Resistance) |
Shop: Akkala Ancient Tech Lab |
- Ancient Armor Bonus: Guardian Resist (Increases Defense against guardian weapons)
- Full Ancient Armor Set Bonus: Ancient Proficiency (Attack Boost when using ancient weapons)
Barbarian Armor Set


|
Barbarian Set
|
Defense Rating
|
How To Get
|
|---|---|---|
| Barbarian Helm | 3 (Attack Up) |
Tu Ka’loh Shrine |
| Barbarian Armor | 3 (Attack Up) |
Dila Maag Shrine |
| Barbarian Leg Wraps | 3 (Attack Up) |
Qaza Tokki Shrine |
- Barbarian Armor Bonus: Attack Up (Increases the Damage you Deal with Weapons.)
- Full Barbarian Armor Set Bonus: Reduces stamina used by charge attacks
Climber Armor Set


|
Climber Set
|
Defense Rating
|
How To Get
|
|---|---|---|
| Climber’s Banadanna | 3 (Faster Climb Speed) |
Treasure Chest (Ree Dahee Shrine) |
| Climber’s Gear | 3 (Faster Climb Speed) |
Chaas Qeta Shrine |
| Climber’s Boots | 3 (Faster Climb Speed) |
Complete Shrine Quest “Secret of the Cedars“. |
- Climber’s Armor Bonus: Faster Climb Speed
- Full Climber’s Armor Set Bonus: Reduces stamina used while Climbing
Dark Link Armor Set


|
Dark Link Set
|
Defense Rating
|
How To Get
|
|---|---|---|
| Dark Hood | 3 | Purchase from Kilton’s Monster Shop |
| Dark Tunic | 3 | Purchase from Kilton’s Monster Shop |
| Dark Trousers | 3 | Purchase from Kilton’s Monster Shop |
- Dark Link Armor Bonus: There is no bonus on the individual armor.
- Full Dark Link Armor Set Bonus: Faster Movement Speed At Night.
Desert Voe Armor Set


|
Desert Voe Set
|
Defense Rating
|
How To Get
|
|---|---|---|
| Desert Voe Headband | 3 Heat Resistance |
Shop: Gerudo Secret Club Rhondson’s Shop: Tarrey Town |
| Desert Voe Spaulder | 3 Heat Resistance |
Shop: Gerudo Secret Club Rhondson’s Shop: Tarrey Town |
| Desert Voe Trousers | 3 Heat Resistance |
Shop: Gerudo Secret Club Rhondson’s Shop: Tarrey Town (Password: GSC<>) |
- Desert Voe Armor Bonus: Heat Resistance.
- Full Desert Voe Armor Set Bonus: Shock Resistance.
Flamebreaker Armor Set


|
Flamebreaker Set
|
Defense Rating
|
How To Get
|
|---|---|---|
| Flamebreaker Helm | 3 Flame Guard |
Shop: Goron City (2,000 Rupees) |
| Flamebreaker Armor | 3 Flame Guard |
Southern Mine (Complete Fireproof Lizard Roundup Side Quest.) Goron City (600 Rupees) |
| Flamebreaker Boots | 3 Flame Guard |
Shop: Goron City (700 Rupees) |
- Flamebreaker Armor Bonus: Flame Guard (Prevents damage from lava-induced temperatures.)
- Full Flamebreaker Armor Set Bonus: FireProof (Makes you immune to Burnt Effect.)
Gerudo Armor Set


|
Gerudo Set
|
Defense Rating
|
How To Get
|
|---|---|---|
| Gerudo Veil | 1 | Main Quest: Forbidden City Entry Kara Kara Bazaar The Gerudo Villa on top of the Tower (600 Rupees Whole Set) |
| Gerudo Top | 1 | (600 Rupees Whole Set) |
| Gerudo Sirwal | 1 | (600 Rupees Whole Set) |
- Gerudo Armor Bonus: There is no bonus on the individual armor.
- Full Gerudo Armor Set Bonus: Heat Resistance.
Hylian Armor Set


|
Hylian Set
|
Defense Rating
|
How To Get
|
|---|---|---|
| Hylian Hood | 3 | Kakariko Village, Hateno Village (60 Rupees) |
| Hylian Tunic | 3 | Kakariko Village, Hateno Village (120 Rupees) |
| Hylian Trousers | 3 | Kakariko Village, Hateno Village (90 Rupees) |
- Hylian Armor Bonus: There is no bonus on the individual armor.
- Full Hylian Armor Set Bonus: There is no bonus on the Full Set of this armor.
Radiant Armor Set


|
Radiant Set
|
Defense Rating
|
How To Get
|
|---|---|---|
| Radiant Mask | 3 Attracts Skeletal Enemies |
Gerudo Town Secret Club (Password: GSC<>) |
| Radiant Shirt | 3 Attracts Skeletal Enemies |
Gerudo Town Secret Club |
| Radiant Tights | 3 Attracts Skeletal Enemies |
Gerudo Town Secret Club |
- Radiant Armor Bonus: Attracts Skeletal Enemies.
- Full Radiant Armor Set Bonus: Increases Attack Damage with Bone Weapons, disguises Link from Stal-type enemy.
Rubber Armor Set


|
Rubber Set
|
Defense Rating
|
How To Get
|
|---|---|---|
| Rubber Helm | 3 Shock Resistance |
Side Quest: Thunder Magnet |
| Rubber Armor | 3 Shock Resistance |
Toh Yahsa Shrine |
| Rubber Tights | 3 Shock Resistance |
Qukah Nata Shrine |
- Rubber Armor Bonus: Shock Resistance.
- Full Rubber Armor Set Bonus: Unshockable (Makes you immune to shock effect.)
Snowquill Armor Set


|
Snowquill Set
|
Defense Rating
|
How To Get
|
|---|---|---|
| Snowquill Headdress | 3 Cold Resistance |
Shop: Rito Village (1,000 Rupees) |
| Snowquill Tunic | 3 Cold Resistance |
Shop: Rito Village (600 Rupees) |
| Snowquill Trouser | 3 Cold Resistance |
Shop: Rito Village (550 Rupees) |
- Snowquill Armor Bonus: Cold Resistance
- Full Snowquill Armor Set Bonus: UnFreezable (Makes you immune to frozen effect.)
Soldier Armor Set


|
Soldier Set
|
Defense Rating
|
How To Get
|
|---|---|---|
| Soldier Headdress | 4 | Shop: Hateno Village (180 Rupees) |
| Soldier Tunic | 4 | Shop: Hateno Village (250 Rupees) |
| Soldier Trouser | 4 | Shop: Hateno Village (200 Rupees) |
- Soldier Armor Bonus: There is no bonus on the individual armor.
- Full Soldier Armor Set Bonus: There is no bonus on the Full Set of this armor.
Stealth Armor Set


|
Stealth Set
|
Defense Rating
|
How To Get
|
|---|---|---|
| Stealth Headdress | 2 (Stealth Up) |
Shop: Kakariko Village |
| Stealth Tunic | 2 (Stealth Up) |
Shop: Kakariko Village |
| Stealth Trouser | 2 (Stealth Up) |
Shop: Kakariko Village |
- Stealth Armor Bonus: Stealth Up (Increases you ability to Sneak.)
- Full Stealth Armor Set Bonus: Faster Movement Speed At Night.
Zora Armor Set


|
Zora Set
|
Defense Rating
|
How To Get
|
|---|---|---|
| Zora Helm | 2 (Faster Swim Speed) (Swimming Spin Attack) |
North East of Zora’s Domain at Toto Lake. There are some ruins under the water. Use Magnesis to scan under the surface and raise the chest. |
| Zora Armor | 2 (Faster Swim Speed) (Ability To Swim Up Water Falls) |
Obtained Through Main Story (Zora’s Domain) |
| Zora Greaves | 2 (Faster Swim Speed) |
Complete the Lynel Safari Side Quest in Zora’s Domain |
- Zora Armor Bonus: Faster Swim Speed.
- Full Zora Armor Set Bonus: Swim Dash Stamina Up.
Single Pieces of Armor
These individual pieces of clothing do NOT belong to any set, therefore they do not benefit from any Set Bonuses.
|
Single Armor
|
Defense Rating
|
How To Get
|
|---|---|---|
| Korok Mask | 1 (Shakes and lights up if Koroks are hiding nearby.) |
To find the mask’s location, head to the Woodland Stable and look for a book of rumors as part of the NEW DLC Quest: EX Strange Mask Rumors. This will point you to the Lost Woods, where a chest lies in the hollow of a tree. From the two lit torches, follow the breeze from your own torch as the embers flicker to the South, and move slowly. When the wind blows West, keep going South near the edge of the island to a hollow tree with the chest inside. |
| Midna’s Helmet | 7 (Guardian Resist Up) |
To find this helmet, head to the Outpost Ruins in Central Hyrule and find a journal written by Misko the Bandit, as part of the NEW DLC Side Quest: EX Treasure: Twilight Relic. The journal will mentions that midna’s helmet can be found at the sunken Sage Temple Ruins, West of the Giant’s Forest along the Regencia River in Central Hyrule. As you make you way there The Expasion Chest can be found buried in rubble on the far West side along the river’s edge (Use Magnesis on the chest to get it out). |
| Majora’s Mask | 1 (Blend with enemies) |
You find the mask, head to the Outpost Ruins in Central Hyrule and look for a journal left by Misko the Bandit as part of the NEW DLC Side Quest, EX Treasure: Ancient Mask. This will point to the Kolomo Garrison Ruins at the edge of Lake Kolomo in Central Hyrule. The chest can be found buried in rubble just to the left of the entrance to the garrison (use Magnesis on the chest to get it out). |
Thunder Helm |
3 (Lighting Proof) |
Side Quest: The Thunder Helm |
Amber Earrings |
4 (Heat Resistance) |
Jeweler: Gerudo Town |
Diamond Circlet |
4 (Guardian Resistance) |
Jeweler: Gerudo Town |
Opal Earrings |
3 (Faster Swim Speed) |
Jeweler: Gerudo Town |
Ruby Circlet |
3 (Cold Resistance) |
Jeweler: Gerudo Town |
Sapphire Circlet |
3 (Heat Resistance) |
Jeweler: Gerudo Town |
Topaz Earrings |
3 (Shock Resistance) |
Jeweler: Gerudo Town |
Bokoblin Mask |
2 (Bokoblin Disguise) |
Kilton’s Monster Shop |
Lizalfos Mask |
2 (Lizalfos Disguise) |
Kilton’s Monster Shop |
Lynel Mask |
2 (Lynel Disguise) |
Kilton’s Monster Shop |
Moblin Mask |
2 (Moblin Disguise) |
Kilton’s Monster Shop |
Champion’s Tunic |
5 (Display Enemy Health) |
Kakariko Village (Complete Captured Memories) |
Old Shirt |
1 | Chest: Shrine of Ressurection. |
| Sand Boots | 3 (Faster Movement Speed In Sand) |
Side Quest “The Eighth Heroine“. |
Snow Boots |
3 (Faster Movement Speed in Deep Snow.) |
Side Quest “The Forgotten Sword“. |
How Do You Upgrade Armor In Zelda Breath of the Wild?
In Zelda Breath of the Wild players can upgrade their Armor at Great Fairy Fountains. There are 4 in total and will cost you Rupees and Specific Materials depending on Armor you are Upgrading.
| Breath of the Wild Upgrade Cost | Rupee Cost |
|---|---|
| First Armor Upgrade | 100 |
| Second Armor Upgrade | 500 |
| Third Armor Upgrade | 1,000 |
| Fourth Armor Upgrade | 10,000 |
The Rupee Cost is static and remains the same across all the different types of Armor Upgrades in Breath of the Wild. The materials needed however will vary and we have a list below displaying everything you need to know about the costs for every type of clothing in Zelda BotW.
You Can View More About Great Fairy Fountains Here:
Fairy Fountain Locations
Zelda Breath of the Wild Armor Upgrade
If you need help finding the needed materials for Armor Upgrading you view a full list of locations of every material in the game.
| Armor Set | Piece | Level 1 | Level 2 | Level 3 | Level 4 |
|---|---|---|---|---|---|
|
Soldier Set
|
Head
|
5x Chuchu Jelly | 3x Keese Eyeball | 5x Lizalfos Tail | 4x Lynel Hoof |
| 3x Bokoblin Guts | 3x Moblin Guts | 2x Hinox Guts | 2x Lynel Guts | ||
|
Body
|
5x Chuchu Jelly | 3x Keese Eyeball | 5x Lizalfos Tail | 4x Lynel Hoof | |
| 3x Bokoblin Guts | 3x Moblin Guts | 1x Hinox Guts | 2x Lynel Guts | ||
|
Legs
|
5x Chuchu Jelly | 3x Keese Eyeball | 5x Lizalfos Tail | 4x Lynel Hoof | |
| 3x Bokoblin Guts | 3x Moblin Guts | 1x Hinox Guts | 2x Lynel Guts | ||
|
Sheikah Stealth Set
|
Head
|
3x Blue Nightshade
|
5x Blue Nightshade | 8x Silent Shroom | 10x Stealthfin Fish |
| 5x Sunset Firefly | 5x Sneaker River Snail | 5x Silent Princess | |||
|
Body
|
3x Blue Nightshade
|
5x Blue Nightshade | 8x Silent Shroom | 10x Stealthfin Fish | |
| 5x Sunset Firefly | 5x Sneaker River Snail | 5x Silent Princess | |||
|
Legs
|
3x Blue Nightshade
|
5x Blue Nightshade | 8x Silent Shroom | 10x Stealthfin Fish | |
| 5x Sunset Firefly | 5x Sneaker River Snail | 5x Silent Princess | |||
|
Zora Set
|
Head
|
3x Lizalfos Horn
|
5x Lizalfos Talon | 5x Lizalfos Tail | 10x Lizalfos Tail |
| 5x Hyrule Bass | 5x Hearty Bass | 15x Opal | |||
|
Body
|
3x Lizalfos Horn
|
5x Lizalfos Talon | 5x Lizalfos Tail | 10x Lizalfos Tail | |
| 5x Hyrule Bass | 5x Hearty Bass | 15x Opal | |||
|
Legs
|
3x Lizalfos Horn
|
5x Lizalfos Talon | 5x Lizalfos Tail | 10x Lizalfos Tail | |
| 5x Hyrule Bass | 5x Hearty Bass | 15x Opal | |||
|
Radiant Set
|
Head
|
5x Luminous Stones | 8x Luminous Stones | 10x Luminous Stones | 20x Luminous Stones |
| 3x Bokoblin Guts | 3x Moblin Guts | 3x Molduga Guts | 1x Lynel Guts | ||
|
Body
|
5x Luminous Stones | 8x Luminous Stones | 10x Luminous Stones | 20x Luminous Stones | |
| 3x Bokoblin Guts | 3x Moblin Guts | 3x Molduga Guts | 1x Lynel Guts | ||
|
Legs
|
5x Luminous Stones | 8x Luminous Stones | 10x Luminous Stones | 20x Luminous Stones | |
| 3x Bokoblin Guts | 3x Moblin Guts | 3x Molduga Guts | 1x Lynel Guts | ||
|
Rubber Set
|
Head
|
3x Yellow Chuchu Jelly
|
5x Yellow Chuchu Jelly | 5x Zapshroom | 10x Yellow Lizalfos Tail |
| 5x Voltfruit | 5x Yellow Lizalfos Tail | 10x Topaz | |||
|
Body
|
3x Yellow Chuchu Jelly
|
5x Yellow Chuchu Jelly | 5x Zapshroom | 10x Yellow Lizalfos Tail | |
| 5x Voltfruit | 5x Yellow Lizalfos Tail | 10x Topaz | |||
|
Legs
|
3x Yellow Chuchu Jelly
|
5x Yellow Chuchu Jelly | 5x Zapshroom | 10x Yellow Lizalfos Tail | |
| 5x Voltfruit | 5x Yellow Lizalfos Tail | 10x Topaz | |||
|
Snowquill Set
|
Head
|
3x Red Chuchu Jelly
|
5x Red Chuchu Jelly | 8x Fire Keese Wing | 10x Red Lizalfos Tail |
| 3x Warm Safflina | 5x Sunshroom | 5x Ruby | |||
|
Body
|
3x Red Chuchu Jelly
|
5x Red Chuchu Jelly | 8x Fire Keese Wing | 10x Red Lizalfos Tail | |
| 3x Warm Safflina | 5x Sunshroom | 5x Ruby | |||
|
Legs
|
3x Red Chuchu Jelly
|
5x Red Chuchu Jelly | 8x Fire Keese Wing | 10x Red Lizalfos Tail | |
| 3x Warm Safflina | 5x Sunshroom | 5x Ruby | |||
|
Wind Set
|
Head
|
3x Opal | 5x Opal | 10x Opal | 20x Opal |
| 1x Star Fragment | 2x Star Fragment | 3x Star Fragment | 4x Star Fragment | ||
|
Body
|
3x Opal | 5x Opal | 10x Opal | 20x Opal | |
| 1x Star Fragment | 2x Star Fragment | 3x Star Fragment | 4x Star Fragment | ||
|
Legs
|
3x Opal | 5x Opal | 10x Opal | 20x Opal | |
| 1x Star Fragment | 2x Star Fragment | 3x Star Fragment | 4x Star Fragment | ||
|
Hero Set
|
Head
|
1x Ruby | 3x Ruby | 5x Ruby | 10x Ruby |
| 1x Star Fragment | 2x Star Fragment | 3x Star Fragment | 4x Star Fragment | ||
|
Body
|
1x Ruby | 3x Ruby | 5x Ruby | 10x Ruby | |
| 1x Star Fragment | 2x Star Fragment | 3x Star Fragment | 4x Star Fragment | ||
|
Legs
|
1x Ruby | 3x Ruby | 5x Ruby | 10x Ruby | |
| 1x Star Fragment | 2x Star Fragment | 3x Star Fragment | 4x Star Fragment | ||
|
Hylian Set
|
Head
|
5x Bokoblin Horn
|
8x Bokoblin Horn | 10x Bokoblin Fang | 15x Bokoblin Guts |
| 5x Bokoblin Fang | 5x Bokoblin Guts | 30x Amber | |||
|
Body
|
5x Bokoblin Horn
|
8x Bokoblin Horn | 10x Bokoblin Fang | 15x Bokoblin Guts | |
| 5x Bokoblin Fang | 5x Bokoblin Guts | 30x Amber | |||
|
Legs
|
5x Bokoblin Horn
|
8x Bokoblin Horn | 10x Bokoblin Fang | 15x Bokoblin Guts | |
| 5x Bokoblin Fang | 5x Bokoblin Guts | 30x Amber | |||
|
Time Set
|
Head
|
3x Amber | 5x Amber | 15x Amber | 30x Amber |
| 1x Star Fragment | 2x Star Fragment | 3x Star Fragment | 4x Star Fragment | ||
|
Body
|
3x Amber | 5x Amber | 15x Amber | 30x Amber | |
| 1x Star Fragment | 2x Star Fragment | 3x Star Fragment | 4x Star Fragment | ||
|
Legs
|
3x Amber | 5x Amber | 15x Amber | 30x Amber | |
| 1x Star Fragment | 2x Star Fragment | 3x Star Fragment | 4x Star Fragment | ||
|
Twilight Set
|
Head
|
1x Topaz | 3x Topaz | 5x Topaz | 10x Topaz |
| 1x Star Fragment | 1x Star Fragment | 1x Star Fragment | 1x Star Fragment | ||
|
Body
|
1x Topaz | 3x Topaz | 5x Topaz | 10x Topaz | |
| 1x Star Fragment | 1x Star Fragment | 1x Star Fragment | 1x Star Fragment | ||
|
Legs
|
1x Topaz | 3x Topaz | 5x Topaz | 10x Topaz | |
| 1x Star Fragment | 1x Star Fragment | 1x Star Fragment | 1x Star Fragment | ||
|
Wild Set
|
Head
|
10x Acorn | 5x Courser Bee Honey | 5x Energetic Rhino Beetle | 1x Star Fragment |
| 2x Farosh’s Scale | 2x Farosh’s Claw | 2x Farosh’s Fang | 2x Farosh’s Horn | ||
|
Body
|
10x Acorn | 5x Courser Bee Honey | 5x Energetic Rhino Beetle | 1x Star Fragment | |
| 2x Naydra’s Scale | 2x Naydra’s Claw | 2x Naydra’s Fang | 2x Naydra’s Horn | ||
|
Legs
|
10x Acorn | 5x Courser Bee Honey | 5x Energetic Rhino Beetle | 1x Star Fragment | |
| 2x Dinraal’s Scale | 2x Dinraal’s Claw | 2x Dinraal’s Fang | 2x Dinraal’s Horn | ||
|
Ancient Set
|
Head
|
5x Ancient Screw | 15x Ancient Spring | 15x Ancient shaft | 1x Star Fragment |
| 5x Ancient Spring | 10x Ancient Gear | 5x Ancient Core | 2x Giant Ancient Core | ||
|
Body
|
5x Ancient Screw | 15x Ancient Spring | 15x Ancient shaft | 1x Star Fragment | |
| 5x Ancient Spring | 10x Ancient Gear | 5x Ancient Core | 2x Giant Ancient Core | ||
|
Legs
|
5x Ancient Screw | 15x Ancient Spring | 15x Ancient shaft | 1x Star Fragment | |
| 5x Ancient Spring | 10x Ancient Gear | 5x Ancient Core | 2x Giant Ancient Core | ||
|
Sky Set |
Head
|
1x Sapphire | 3x Sapphire | 5x Sapphire | 10x Sapphire |
| 1x Star Fragment | 2x Star Fragment | 3x Star Fragment | 4x Star Fragment | ||
|
Body
|
1x Sapphire | 3x Sapphire | 5x Sapphire | 10x Sapphire | |
| 1x Star Fragment | 2x Star Fragment | 3x Star Fragment | 4x Star Fragment | ||
|
Legs
|
1x Sapphire | 3x Sapphire | 5x Sapphire | 10x Sapphire | |
| 1x Star Fragment | 2x Star Fragment | 3x Star Fragment | 4x Star Fragment | ||
|
Desert Voe Set
|
Head
|
3x White Chuchu Jelly | 5x White Chuchu Jelly | 8x Ice Keese Wing | 10x Icy Lizalfos Tail |
| 3x Ice Keese Wing | 3x Icy Lizalfos Tail | 5x Sapphire | |||
|
Body
|
3x White Chuchu Jelly | 5x White Chuchu Jelly | 8x Ice Keese Wing | 10x Icy Lizalfos Tail | |
| 3x Ice Keese Wing | 3x Icy Lizalfos Tail | 5x Sapphire | |||
|
Legs
|
3x White Chuchu Jelly | 5x White Chuchu Jelly | 8x Ice Keese Wing | 10x Icy Lizalfos Tail | |
| 3x Ice Keese Wing | 3x Icy Lizalfos Tail | 5x Sapphire | |||
|
Fierce Diety Set
|
Head
|
5x Hinox Toenail | 5x Hinox Tooth | 5x Hinox guts | 5x Lynel Guts |
| 1x Dinraal’s Scale | 1x Dinraal’s Claw | 1x Shard of Dinraal’s Fang | 1x Shard of Dinraal’s Horn | ||
|
Body
|
5x Hinox Toenail | 5x Hinox Tooth | 5x Hinox guts | 5x Lynel Guts | |
| 1x Naydra’s Scale | 1x Naydra’s Claw | 1x Shard of Naydra’s Fang | 1x Shard of Naydra’s Horn | ||
|
Legs
|
5x Hinox Toenail | 5x Hinox Tooth | 5x Hinox guts | 5x Lynel Guts | |
| 1x Farosh’s Scale | 1x Farosh’s Claw | 1x Shard of Farosh’s Fang | 1x Shard of Farosh’s Horn | ||
|
Flamebreaker Set
|
Head
|
3x Fireproof Lizard | 5x Fireproof Lizard | 5x Smotherwing Butterfly | 8x Smotherwing Butterfly |
| 3x Moblin Horn | 5x Moblin Fang | 3x Moblin Guts | 5x Hinox Guts | ||
|
Body
|
3x Fireproof Lizard | 5x Fireproof Lizard | 5x Smotherwing Butterfly | 8x Smotherwing Butterfly | |
| 3x Moblin Horn | 5x Moblin Fang | 3x Moblin Guts | 5x Hinox Guts | ||
|
Legs
|
3x Fireproof Lizard | 5x Fireproof Lizard | 5x Smotherwing Butterfly | 8x Smotherwing Butterfly | |
| 3x Moblin Horn | 5x Moblin Fang | 3x Moblin Guts | 5x Hinox Guts | ||
|
Barbarian Set
|
Head
|
3x Lynel Horn | 5x Lynel Horn | 8x Lynel Hoof | 2x Lynel Guts |
| 3x Lynel Hoof | 1x Lynel Guts | 1x Shard of Dinraal’s Horn | |||
|
Body
|
3x Lynel Horn | 5x Lynel Horn | 8x Lynel Hoof | 2x Lynel Guts | |
| 3x Lynel Hoof | 1x Lynel Guts | 1x Shard of Farosh’s Horn | |||
|
Legs
|
3x Lynel Horn | 5x Lynel Horn | 8x Lynel Hoof | 2x Lynel Guts | |
| 3x Lynel Hoof | 1x Lynel Guts | 1x Shard of Naydra’s Horn | |||
|
Climbing Set
|
Head
|
3x Keese Wing | 5x Electric Keese Wing | 5x Ice Keese Wing | 5x Fire Keese Wing |
| 3x Rushroom | 5x Hightail Lizard | 10x Hot-Footed Frog | 20x Swift Violet | ||
|
Body
|
3x Keese Wing | 5x Electric Keese Wing | 5x Ice Keese Wing | 5x Fire Keese Wing | |
| 3x Rushroom | 5x Hightail Lizard | 10x Hot-Footed Frog | 20x Swift Violet | ||
|
Legs
|
3x Keese Wing | 5x Electric Keese Wing | 5x Ice Keese Wing | 5x Fire Keese Wing | |
| 3x Rushroom | 5x Hightail Lizard | 10x Hot-Footed Frog | 20x Swift Violet | ||
|
Head Clothing
|
Amber Earrings
|
3x Amber | 10x Amber | 20x Amber | 30x Amber |
| 3x Flint | 3x Flint | 3x Flint | 3x Flint | ||
|
Topaz Earrings
|
2x Topaz | 4x Topaz | 6x Topaz | 10x Topaz | |
| 3x Flint | 3x Flint | 1x Star Fragment | 1x Star Fragment | ||
|
Opal Earrings
|
3x Opal | 8x Opal | 16x Opal | 20x Opal | |
| 3x Flint | 3x Flint | 3x Flint | 3x Flint | ||
|
Diamond Circlet
|
2x Diamond | 4x Diamond | 6x Diamond | 10x Diamond | |
| 3x Flint | 3x Flint | 1x Star Fragment | 1x Star Fragment | ||
|
Ruby Circlet
|
2x Ruby | 4x Ruby | 6x Ruby | 10x Ruby | |
| 3x Flint | 3x Flint | 1x Star Fragment | 1x Star Fragment | ||
|
Sapphire Circlet
|
2x Sapphire | 4x Sapphire | 6x Sapphire | 10x Sapphire | |
| 3x Flint | 3x Flint | 1x Star Fragment | 1x Star Fragment | ||
|
Sheik’s Mask
|
1x Silent Princess | 2x Silent Princess | 3x Silent Princess | 4x Silent Princess | |
| 1x Star Fragment | 2x Star Fragment | 3x Star Fragment | 4x Star Fragment | ||
| Bokoblin Mask | – | – | – | – | |
| Moblin Mask | – | – | – | – | |
| Lizalfos Mask | – | – | – | – | |
| Lynel Mask | – | – | – | – | |
| Thunder Helm | – | – | – | – | |
|
Body Clothing
|
Old Shirt | – | – | – | – |
| Warm Doublet | – | – | – | – | |
|
Champion’s Tunic
|
3x Silent Princess
|
3x Silent Princess | 3x Silent Princess | 3x Silent Princess | |
| 2x Shard of Farosh’s Horn | 2x Shard of Naydra’s Horn | 2x Shard of Dinraal’s Horn | |||
|
Leg Clothing
|
Well-worn Trousers | – | – | – | – |
|
Sand Boots
|
5x Molduga Fin | 10x Molduga Fin | 3x Molduga Guts | 5x Molduga Guts | |
| 10x Hightail Lizard | 10x Swift Carrot | 15x Rushroom | 15x Swift Violet | ||
|
Snow Boots
|
5x Octorok Tentacle | 5x Octo Balloon | 5x Octorok Eyeball | 2x Naydra’s Scale | |
| 10x Hightail Lizard | 10x Swift Carrot | 15x Rushroom | 15x Swift Violet |
View All Of Our Shrine Walkthroughs Here:
![]()
You Can View Our List of Weapons and Clothing Locations Here:
You Can View Our List of Recipes To Help You Prepare For Your Adventure: